6. Condition과 @Conditional
- 조건에 따라 빈의 등록 여부를 결정. @Bean, @Component와 같이 사용
- Condition의 matches()를 구현한 클래스를 @Conditional로 지정
class FalseCondition implements Condition {
	public boolean matches(ConditionContext context, AnnotatedTypeMetadata metadata) {
    	return false;
    }
}

class TrueCondition implements Condition {
	public boolean matches(ConditionContext context, AnnotatedTypeMetadata metadata) {
    	return true;
    }
}
Condition 인터페이스를 구현한 조건 클래스 작성.
조건 중 false가 반환되면 빈 등록 X, true가 반환되면 빈 등록 O
이렇게 어떤 조건을 만든 다음에 @Component나 @Bean 애너테이션에 같이 @Conditional을 붙여준다.
@Component
@Conditional(FalseCondition.class)
class Engine {public String toString() {return "Engine{}";} }

@Component
@Conditional(TrueCondition.class)
class Door {public String toString() {return "Door{}";} }
@Conditional이 없을 시 무조건 빈을 등록하는데, @Conditional을 이용해서 조건을 만족할 때만 빈이 등록되도록
하는 것이다.
예제에서는 Engine은 빈으로 등록 X, Door는 빈으로 등록 O
* 조건부 빈 등록
1) @Bean @Component + @Conditional
개별 빈. 한 개에 대해서 조건적으로 등록
2) @Configuration + @Import + @ImportSelector
빈 여러 개를 묶어놓고, 이 빈을 통째로 등록할지 말지를 @ImportSelector가 조건부 결정을 한다.
* 스프링부트 핵심 2가지
1) Starter : 의존 라이브러리 자동 관리
2) AutoConfiguration : 빈 등록 자동 관리 (여기 내용!)
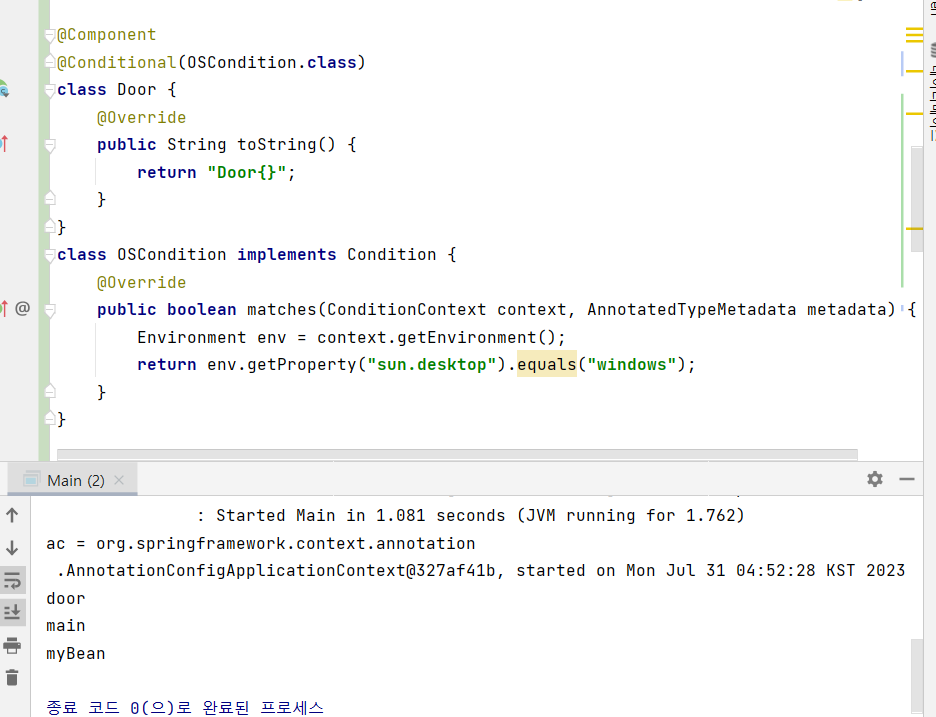
* Conditional
1) Condition 인터페이스 구현 -> metadata는 @Conditional이 붙은 클래스가 metadata로 들어온다.
그래서 어떤 클래스에 @Conditional을 붙였는지 metadata를 통해 알 수 있다.
ConditionCotext는 빈 목록, 환경 정보와 같은 정보들을 제공받을 수 있다.
6. Condition과 @Conditional
- 그 밖에 여러 조건부로 빈을 등록하는 여러 애너테이션을 제공
| 조건부 빈 등록 애너테이션 | 설 명 |
| @ConditionalOnBean | 지정한 빈들이 이미 등록되어 있을 때 |
| @ConditionalOnClass | 지정된 클래스들이 classpath에 있을 때 |
| @ConditionalOnMissingBean | 지정한 빈들이 아직 등록되어 있지 않을 때 |
| @ConditionalOnMissingClass | 지정된 클래스들이 classpath에 있지 않을 때 |
| @ConditionalOnProperty | 지징된 property가 지정된 value와 일치할 때 |
| @ConditionalOnResource | 지정된 리소스가 classpath에 있을 때 |
| @ConditionalOnJava |
지정된 JVM 버전에서 application이 실행 중 일 때 |
| @ConditionalOnWebApplication | 웹 애플리케이션일 때 |
| @ConditionalOnNotWebApplication | 웹 애플리케이션이 아닐 |
7. @import와 ImportSelector
- 조건에 따라 다른 Configuration을 적용할 때 사용
- ImportSelector(조건 작성)를 구현하고 이를 @Import하는 애너테이션을 작성해서 적용
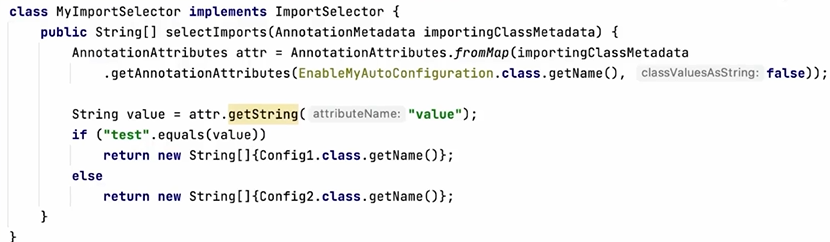
1) 먼저 ImportSelector를 구현
-> if문으로 자바 설정 클래스를 지정
EnableMyAutoConfiguration이라고 애너테이션을 만들고, 거기에 @Import를 붙이면 EnableMyAutoConfiguration이
importingClassMetadata가 된다.
importingClassMetadata는 @Import 어노테이션이 붙은 대상(애너테이션, 클래스..)가 들어간다.
거기에서 AnnotationAttributes.fromMap을 이용해서 애너테이션에 지정된 값을 읽어올 수 있다.

Value = "test"와 같아서 간단히 test를 쓴 것. AnnotationAttributes는 이런 것들을 말하며, 사용자가 어떤 값들을 지정했는지
읽어오려고 하는 것이다.
읽어온 값을 확인해서 해당하는 설정 파일을 반환한다.
<실습>
[Main.java]
@Component
@Conditional(TrueCondition.class)
class Engine {
    @Override
    public String toString() {
        return "Engine{}";
    }
}

@Component
@Conditional(FalseCondition.class)
class Door {
    @Override
    public String toString() {
        return "Door{}";
    }
}
class TrueCondition implements Condition {
    @Override
    public boolean matches(ConditionContext context, AnnotatedTypeMetadata metadata) {
        return true;
    }
}

class FalseCondition implements Condition {
    @Override
    public boolean matches(ConditionContext context, AnnotatedTypeMetadata metadata) {
        return false;
    }
}


//@SpringBootApplication // 은 아래의 3개 애너테이션을 붙인것과 동일
@Configuration
//@EnableAutoConfiguration
@ComponentScan
public class Main {
    public static void main(String[] args) {
        ApplicationContext ac = SpringApplication.run(Main.class, args);
        System.out.println("ac = " + ac);
        String[] beanDefinitionNames = ac.getBeanDefinitionNames();

        Arrays.sort(beanDefinitionNames); // 빈 목록이 담긴 배열을 정렬
        Arrays.stream(beanDefinitionNames) // 배열의 스트림을 반환
                .filter(b->!b.startsWith("org"))
                .forEach(System.out::println); // 스트림의 요소를 하나씩 꺼내서 출력
    }

    @Bean
    MyBean myBean() {return new MyBean();}
}

    class MyBean {}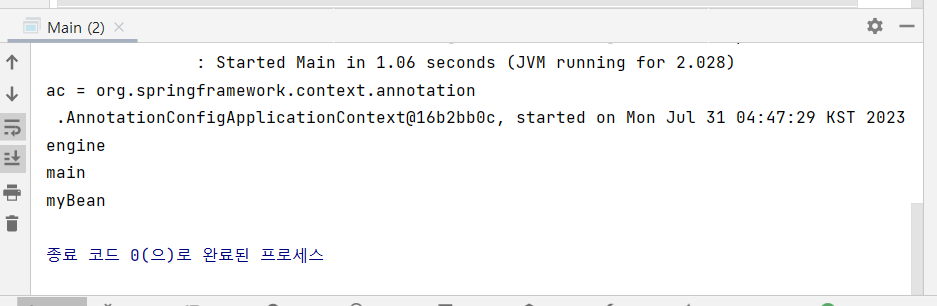
조건에 맞는 engine만 빈으로 등록이 되었다.
이런식으로 조건을 조금 더 복잡하게 설정해서 적용하는 것도 가능하다.
- Import와 Importselector
[Main.java]
3개의 클래스와 설정 파일 생성
class Car {
    public String toString() {
        return "Car{}";
    }
}

class SportsCar extends Car {
    public String toString() {
        return "SportsCar{}";
    }
}

class SportsCar2 extends Car {
    public String toString() {
        return "SportsCar2{}";
    }
}
class MainConfig{ // 자바 설정 파일
@Bean Car car() {return new Car();}
}
class Config1{ // 자바 설정 파일
@Bean Car sportsCar() {return new SportsCar();}
}
class Config2{ // 자바 설정 파일
@Bean Car sportsCar() {return new SportsCar2();}
}public class Main {
public static void main(String[] args) {
// ApplicationContext ac = SpringApplication.run(Main.class, args);
ApplicationContext ac = new AnnotationConfigApplicationContext(MainConfig.class, Config1.class, Config2.class);
System.out.println("ac = " + ac);
String[] beanDefinitionNames = ac.getBeanDefinitionNames();
Arrays.sort(beanDefinitionNames); // 빈 목록이 담긴 배열을 정렬
Arrays.stream(beanDefinitionNames) // 배열의 스트림을 반환
.filter(b->!b.startsWith("org"))
.forEach(System.out::println); // 스트림의 요소를 하나씩 꺼내서 출력
System.out.println("ac.getBean(\"sportsCar\") = " + ac.getBean("sportsCar"));
}
자바 설정 파일이 빈으로 등록되었다.
실제로 어떤게 등록되었는지 출력해보면, SportsCar가 등록된 것을 볼 수 있다.
순서대로 읽어서 등록을 하니, 앞에서 읽었던 것을 뒤에서 덮은 것이다.
- 이번엔 @Import를 이용해보자
public class Main {
public static void main(String[] args) {
// ApplicationContext ac = SpringApplication.run(Main.class, args);
// ApplicationContext ac = new AnnotationConfigApplicationContext(MainConfig.class, Config1.class, Config2.class);
ApplicationContext ac = new AnnotationConfigApplicationContext(MainConfig.class);
System.out.println("ac = " + ac);
String[] beanDefinitionNames = ac.getBeanDefinitionNames();
Arrays.sort(beanDefinitionNames); // 빈 목록이 담긴 배열을 정렬
Arrays.stream(beanDefinitionNames) // 배열의 스트림을 반환
.filter(b->!b.startsWith("org"))
.forEach(System.out::println); // 스트림의 요소를 하나씩 꺼내서 출력
System.out.println("ac.getBean(\"sportsCar\") = " + ac.getBean("sportsCar"));
}@Import({Config1.class, Config2.class})
class MainConfig{ // 자바 설정 파일
    @Bean Car car() {return new Car();}
}

class Config1{ // 자바 설정 파일
    @Bean Car sportsCar() {return new SportsCar();}
}

class Config2{ // 자바 설정 파일
    @Bean Car sportsCar() {return new SportsCar2();}
}MainConfig 설정 파일 하나만 적어주고, @Import로 Config1, Config2를 넣어줘서 다 포함되어 있는 것과 같은 효과를
만들 수 있다.

위와 같은 결과를 얻었다.
- @Import를 조건부로 설정해보자. - ImportSelector를 구현
@EnableMyAutoConfiguration("test")
class MainConfig{ @Bean Car car() {return new Car();}}
class Config1{ @Bean Car sportsCar() {return new SportsCar();}}
class Config2{ @Bean Car sportsCar() {return new SportsCar2();}}
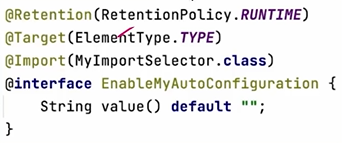
@Target(ElementType.TYPE)
@Retention(RetentionPolicy.RUNTIME)
@Import(MyImportSelector.class)
@interface EnableMyAutoConfiguration {
String value() default "";
}
class MyImportSelector implements ImportSelector {
@Override
public String[] selectImports(AnnotationMetadata importingClassMetadata) {
AnnotationAttributes attr =
AnnotationAttributes.fromMap(importingClassMetadata.getAnnotationAttributes(EnableMyAutoConfiguration.class.getName(), false));
// String mode = "test";
String mode = attr.getString("value");
if(mode.equals("test"))
return new String[]{Config1.class.getName()}; // import할 클래스 지정
else
return new String[]{Config2.class.getName()}; // import할 클래스 지정
}
}
+ 실습해보니 어렵다... 꼼꼼하게 복습하자 ㅠ
'SpringBoot' 카테고리의 다른 글
| ch3 10. AOP 원리와 용어 (0) | 2023.07.31 |
|---|---|
| ch3 09. 외부 설정 사용하기 (0) | 2023.07.31 |
| ch3 07. 의존성 관리와 설정의 자동화(2) (0) | 2023.07.31 |
| ch3 06. 의존성 관리와 설정의 자동화(1) (0) | 2023.07.31 |
| ch3 05. Spring 애너테이션 (0) | 2023.07.30 |


